
Last Updated on February 22, 2026 by Kimberly Stroh
There are so many cool and creative Easter egg dying techniques. You don’t need to buy a kit at the store. That really limits your creativity. Instead, try this tissue paper dyed Easter egg method. The colors come out vibrant and it’s a great method for kids to try.


Related: Bunny Butt Rice Krispie Treats
When To Make Your Dyed Easter Eggs
Make your Easter eggs a few weeks before Easter. They can sit out, on a table, at room temperature for 7-9 days without any odor. I do not recommend eating the hard-boiled eggs. The dye from the tissue paper can seep through the shell. It’s not worth the risk. These are beautiful as a centerpiece on Easter!
What Type of Tissue Paper To Use
There are different types of tissue paper on the market. You want a tissue paper that will purposely bleed, so the dye transfers onto the eggs. This is an important part of Easter egg dying with tissue paper. If you use regular tissue paper, you wont get that vibrant bright color. Purchase the Bleeding Tissue Paper on Amazon or at your local craft store.


How To Dye Easter Eggs Using Tissue Paper
I love that you don’t need to use vinegar for this method. Kids hate the smell of vinegar and you can’t control the colors of the eggs well. This is such a great alternative method to dying eggs – you may never go back to the old version.
Materials Needed To Dye Easter Eggs With Tissue Paper
- Hardboiled Eggs
- Bleeding Tissue Paper (Has to say bleeding for it to work – like this version from Amazon)
- Spray Bottle of Water
- Paper Towels/Newspaper
- Optional: Latex/Plastic Gloves


Cut tissue paper into small pieces. They don’t have to be perfect, we made some rectangle, square, and triangle.


Place the hardboiled eggs on layers of paper towels or newspaper. Spray the eggs with water and place pieces of tissue paper all over it. Mix and match colors to give it a super fun look.


Use gloves at this point if you do not want any coloring on your hands because it will transfer off the tissue paper. We did not use gloves and the coloring was off our hands by the next day.
Once the paper is placed on the egg, spray the egg again with water making sure all the tissue paper is laying down. Let dry.


Once the tissue paper is dried, peel it off the egg and discard. You’ll be left with a gorgeous looking Easter Egg!!


How To Dye Easter Eggs With Tissue Paper
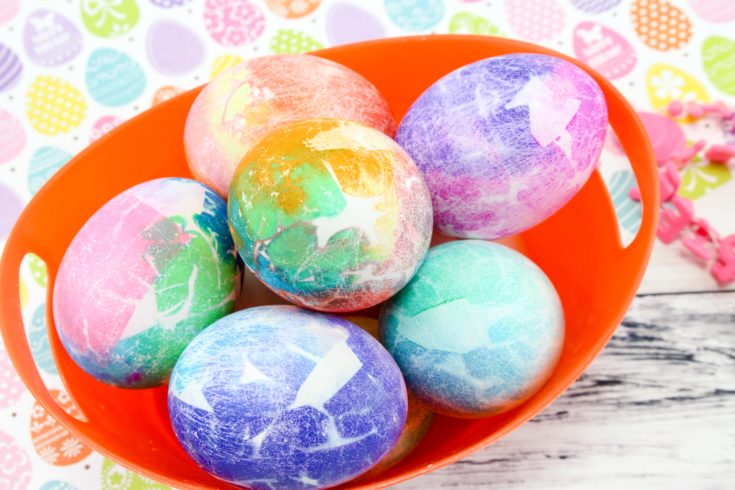

This creative Easter egg dying technique uses tissue paper to create beautiful color!
Materials
- Hardboiled Eggs
- Bleeding Tissue Paper (Has to say bleeding for it to work)
- Spray Bottle of Water
- Paper Towels/Newspaper
- Optional: Latex/Plastic Gloves
Instructions
- Cut tissue paper into small pieces. They don’t have to be perfect, we made some rectangle, square, and triangle.
- Place the hardboiled eggs on layers of paper towels or newspaper. Spray the eggs with water and place pieces of tissue paper all over it. Mix and match colors to give it a super fun look. (Use gloves at this point if you do not want any coloring on your hands because it will transfer off the tissue paper. We did not use gloves and the coloring was off our hands by the next day.
- Once the paper is placed on the egg, spray the egg again with water making sure all the tissue paper is laying down. Let dry.
- Once the tissue paper is dried, peel off the egg and discard. You’ll be left with a gorgeous looking Easter Egg!!
- Store in refrigerator if you plan on eating them.
Notes
- I do not recommend eating the Easter eggs. Place them on display for 7-9 days before discarding.
Recommended Products
As an Amazon Associate and member of other affiliate programs, I earn from qualifying purchases.

