
Last Updated on January 12, 2025 by Kimberly Stroh
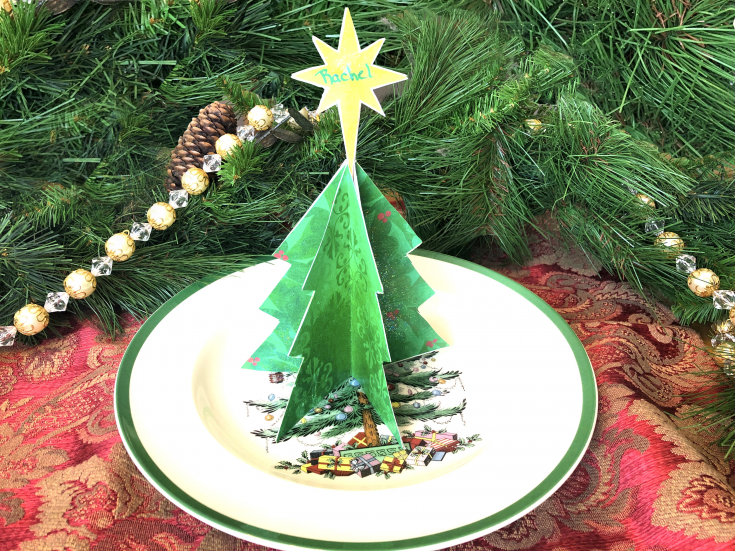
I’ve always enjoyed setting our Christmas dinner table every year. To add a little extra magic, a personal touch can go a long ways. You don’t have to bear the holiday traffic or spend extra money to make your Christmas table look great. These easy tree-shaped DIY Christmas name place card holders are so cute and festive. Just print out the template, glue and write in the individual names. They’ll look great on your table this year!

This is such a fun and easy DIY that anyone can make. The template really helps guide you and I’ve got easy instructions below. All you need to do is personalize each name card for your guests, with your own handwriting.
They’re so cute with the traditional Spode Christmas Tree china, but they’ll go great with any table setting that you pick. Just place them on top of everyone’s place before they’re seated. I know you’ll get so many compliments on how cute they look!
Looking for more Christmas Crafts and Printables? I’ve got you covered for a great DIY Christmas. Check out some of these fun ideas:
How To Make Your Own Christmas Name Place Card Holders
Most of the supplies you’ll need for this craft are probably already around your home. If not, you can find everything you need via Amazon, craft store or local box store – like Walmart. I always make mine a few ahead of time, before Christmas, and print out some extras. You never know when you’ll get a last-minute guest and need more!
This printable template will create two trees total – so just print out extra templates for however many guests you’ll have at your Christmas dinner.
Materials Needed For Christmas Name Place Card Holders:
- Cardstock
- Scissors
- Glue Stick
- Pen Or Marker (For Writing In The Names)
- Toothpick
- Optional: Mod Podge Sparkle (Helps The Trees Become More Sturdy & Adds Sparkle)
Click Here To Print Your Christmas Place Card Holder Template

Step-By-Step Instructions For DIY Christmas Place Card Holders
Using card stock, print out both sheets. Using small, sharp scissors, cut out all six trees and two stars. Fold all of the tree shapes in half with the pattern inside.

Use a hard flat tool to crease the trees halves. This helps them stay folded well. Apply glue to the outside half of one of the trees.

Choose another tree half in the contrasting pattern. Glue it to the first half, blank sides together carefully lining up the edges. Press down and allow a bit of time for the glue to dry.

Glue each of the tree halves together, one on top of the next to get a layered 3D tree shape. Continue until you’re out of tree halves (Glue the last two halves together).

Next, if desired, write a name or a holiday greeting on the stars. Glue the two stars together, with a tooth pick in the middle.

Totally optional: Paint your tree with Mod Podge Sparkle. This helps the tree to be a bit more sturdy and adds some special glimmer to it! Allow the tree to dry for several hours.

Use some glue on the end of the toothpick. Insert it into the top of the tree!

DIY Christmas Name Place Card Holders

Print out the template for this easy DIY Christmas Place Card Holder for your holiday table.
Materials
- Cardstock
- Marker
- Toothpick
- Optional: Mod Podge Glitter
Tools
- Scissors
- Glue Stick
- Paint Brush (for optional Mod Podge)
Instructions
1. Using card stock, print out both sheets.
2. Using small, sharp scissors, cut out all six trees and two stars.
3. Fold all of the tree shapes in half with the pattern inside. Use a
hard flat tool to crease the trees halves. This helps them stay
folded well.
4. Apply glue to the outside half of one of the trees.
5. Choose another tree half in the contrasting pattern. Glue it to the
first half, blank sides together carefully lining up the edges. Press
down and allow a bit of time for the glue to dry.
6. Glue each of the tree halves together, one on top of the next to
get a layered 3D tree shape.
7. Continue until you’re out of tree halves. (Glue the last two halves
together.)
10. Next, if desired, write a name or a holiday greeting on the stars. Glue the two stars together, with a tooth pick in the middle.
12. (optional) Paint your tree with Mod Podge Sparkle. This helps the tree to be a bit more sturdy and adds some special glimmer to it! 13. Allow the tree to dry for several hours.
14. Use some glue on the end of the toothpick. Insert it into the top of the tree!
Recommended Products
As an Amazon Associate and member of other affiliate programs, I earn from qualifying purchases.

