Last Updated on February 4, 2023 by Kimberly Stroh
Have you ever started something with your kid and they expect it year after year? That’s what happened to me and Valentines Day Boxes. They’re the box that your kid creates to exchange valentines in their school classroom. Last year, I made a Dinosaur Valentines Box that was a huge hit. This year, we’re doing it again with this Alligator Valentines Box. Kids, ages 4+, can make their own with the help of a parent.


Related: FREE Printable Disney Valentines Day Cards (Baby Yoda & Fancy Nancy)
Why do parents have to help with this project? There are a couple of reasons. First of all, you can easily create this craft with just a glue stick – but it won’t survive the test of time. Add in your kid taking it on a bus or just transporting it to the classroom and you’ll have a frustrated kid.
Secondly, the base of this project is a shoe box. The cardboard of shoe boxes are very durable. You’ll need to help them create a slot in the top portion of the box, so the valentines can be placed inside. That’ll require some careful scissor techniques that younger kids cannot do on their own.
They can decorate the box, help you wrap the box and place stickers on the box. The base of the Alligator Valentines Box will mostly be done by an adult. It’s not difficult though. In fact, it’s mostly like wrapping a Christmas present and few detail steps.


How To Make An Alligator Valentines Box
Materials Needed:
- Shoe Box
- Small Vertical Box
- Scissors
- Glue Gun & Sticks
- Green Craft Paper
- Scotch Tape
- Pencil
- White Foam Paper
- Red Card Stock
- Small Heart Stickers
- Wire Coat Hanger (Like From The Dry Cleaners)
- 2 Cardboard Toilet Paper Rolls (Cut In Half)
- 2 Googly Eyes
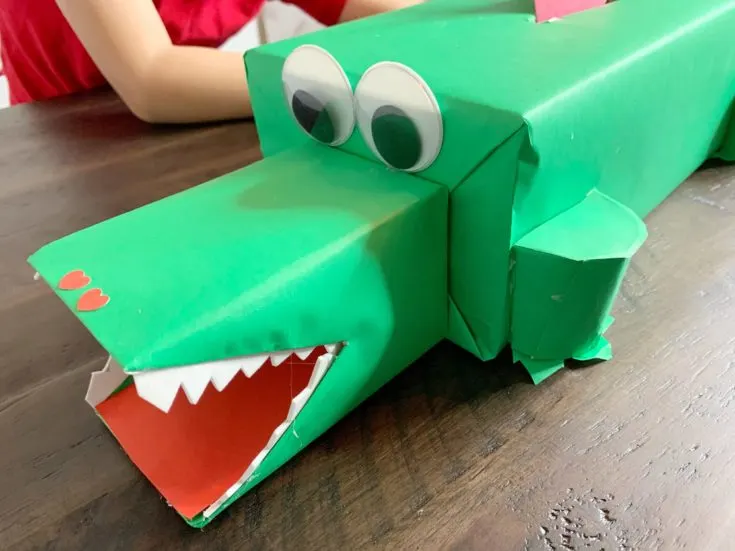
To start, use your scissors to cut a slot on the top of your shoe box. Wrap your box with the green craft paper and Scotch Tape – just like you would a gift. Expose the slot on top by cutting the green craft paper around it.


Next, create the legs. Wrap your half cardboard toilet paper rolls with green craft paper and glue gun.


Cut a strip of green triangles from the craft paper and secure it to the bottom of the covered toilet paper roll, using your glue gun.


Cut off half of the roll (vertically) and secure it to the side of the box. Cover with a small circle of green craft paper. Repeat for all four legs.


To create the face and mouth, cut a v-shape in the top of your smaller box.


Wrap the box with green craft paper (similar to what you did previously) and cut open the “v” mouth portion.


Cut a 4 strips of white triangles, the length of your alligator’s mouth opening, from the white foam paper. These are the teeth. Secure with your glue gun. To finish the mouth, glue red card stock on the bottom. Glue the entire face onto the larger box with you glue gun.


For the tail, smush your wire coat hanger to make it longer. That will be your alligator’s tail. Wrap the tail with your green craft paper. Secure the tail, using your glue gun, to the back of the box.


How To Decorate Your Box:
This is the finishing part that the kids can do all on their own! We glued two large google eyes on the large box, so look like eyes. They can place stickers on the tail. We put small heart stickers on the top of the mouth to be the nose. For an added Valentines Day touch, we added a large cut heart (from the card stock) to the very tip of the Alligator’s tail. Let them be creative!


Alligator Valentines Box Tutorial

Make this fun Alligator Valentines Box with your little reptile fan! It's great for classroom Valentine's Day party.
Materials
- Shoe Box
- Small Vertical Box
- Green Craft Paper
- White Foam Paper
- Red Card Stock
- Small Heart Stickers
- Wire Coat Hanger (Like From The Dry Cleaners)
- 2 Cardboard Toilet Paper Rolls (Cut In Half)
- 2 Googly Eyes
Tools
- Scissors
- Glue Gun & Sticks
- Scotch Tape
- Pencil
Instructions
- To start, use your scissors to cut a slot on the top of your shoe box. Wrap your box with the green craft paper and Scotch Tape - just like you would a gift. Expose the slot on top by cutting the green craft paper around it.
- Next, create the legs. Wrap your half cardboard toilet paper rolls with green craft paper and glue gun. Cut a strip of green triangles from the craft paper and secure it to the bottom of the covered toilet paper roll, using your glue gun.
- Cut off half of the roll (vertically) and secure it to the side of the box. Cover with a small circle of green craft paper. Repeat for all four legs.
- To create the face and mouth, cut a v-shape in the top of your smaller box. Wrap the box with green craft paper (similar to what you did previously) and cut open the "v" mouth portion.
- Cut a 4 strips of white triangles, the length of your alligator's mouth opening, from the white foam paper. These are the teeth. Secure with your glue gun. To finish the mouth, glue red card stock on the bottom. Glue the entire face onto the larger box with you glue gun.
- For the tail, smush your wire coat hanger to make it longer. That will be your alligator's tail. Wrap the tail with your green craft paper. Secure the tail, using your glue gun, to the back of the box.
- How To Decorate Your Box: This is the finishing part that the kids can do all on their own! We glued two large google eyes on the large box, so look like eyes. They can place stickers on the tail. We put small heart stickers on the top of the mouth to be the nose. For an added Valentines Day touch, we added a large cut heart (from the card stock) to the very tip of the Alligator's tail. Let them be creative!
Notes
Use these instructions as a guide. Don't be afraid to make it your own craft! Let the kids decorate however they want. Let the creativity shine!
Recommended Products
As an Amazon Associate and member of other affiliate programs, I earn from qualifying purchases.