
Last Updated on January 6, 2026 by Kimberly Stroh
Making sweet treats in the springtime is so much fun, with the pastel colors and cute little bunny designs. These Easter Bunny Cookie Bars are easy to make for any spring occasion. They’ve got a soft, chewy, texture with a hint of coconut. Then they’re finished with a pink buttercream frosting and candy melts that look like tiny bunnies. They’re just as tasty as they are adorable. Plus, the kids really love them!


Why We Love This Easter Dessert
I think these cookie bars are so festive and fun for spring. The coconut cookie base is soft with sweetened coconut baked into it. It has an awesome buttery and coconutty texture. Then, the topping is a sweet pink buttercream and a cute bunny design. It’s easy to make the bunny design and they come together quickly, with the help of white candy melts.
Looking for even more Easter dessert inspiration? I love these Easter Bunny Carrot Cupcakes and my Easter Trifle recipe! They’re so colorful and fun for any Easter occasion, whether it’s brunch or dinner.


How To Store Leftovers
Transfer the leftovers to an airtight food storage container. If you have to stack the Easter Bunny Cookie Bars, place a sheet of wax paper in between. This will keep the bunny designs from shifting with the weight of other cookie bars on top. For the best freshness, enjoy the Easter Bunny Cookie Bars within 3-4 days of baking them.
The bars also freeze easily! Transfer them to a freezer bag and store them in the back of the freezer, where temperatures are more stable. Freeze the cookie bars for up to three months. Let them thaw at room temperature for several hours before enjoying again.
Easter Bunny Cookie Bars Ingredients:
- All-Purpose Flour
- UnSweetened Shredded Coconut: This adds a bit of texture and flavor to the cookie base
- Salt
- Butter: Unsalted or Salted Sweetened Cream Butter works
- Granulated Sugar
- Egg: Large Size
- Milk: Whole Milk
For The Decorative Topping:
- White Frosting
- Liquid Red Food Coloring
- White Candy Melts: I use the Wilton Brand
- Rainbow Sprinkles (or Easter sprinkles)
- Black Writing Icing


Recipe Variations
Feel free to omit the coconut if you prefer a sugar cookie base. The coconut adds texture and flavor to the base. If you do not want to use red food dye, feel free to substitute whatever colors you’d like instead. A nice light blue or green is fun for spring! All you need is a few drops of the food dye to make the buttercream.
How To Make Easter Bunny Cookie Bars
Preheat the oven to 350ºF. Line a 9×13-inch baking dish with parchment paper. In a mixing bowl, mix the flour, coconut, and salt; set aside.


With an electric mixer on medium speed, beat 1 cup of butter and sugar until fluffy. Beat in egg, then milk. Stir in the flour mixture.


Using moist fingers, press into the bottom of a pan. Bake until the edges are golden for 20-25 minutes. Let it cool completely.


For the decorations: Tint the tub of frosting pink. Remove about 2 teaspoons of icing and place it into a small resealable bag and seal it shut. Set aside.


Spread the remaining frosting over the cookie. Cut the cookie into 12 bars.


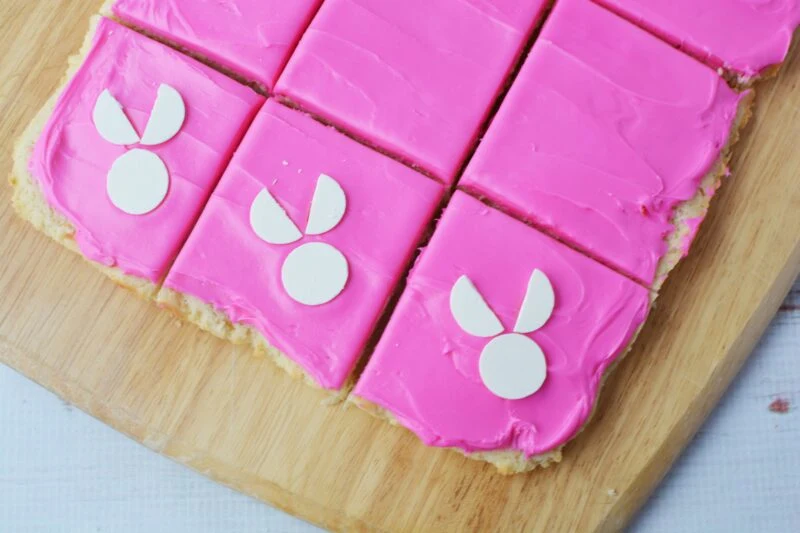
Cut 12 white candy melts in half. Press whole candy melts (flat side up) into the frosting and 2 half
candy melts onto frosting for bunny heads and ears.

Add sprinkles to the icing while it’s wet. Carefully remove any sprinkles from the candy melts.
With the reserved pink frosting, cut a small tip in the bag and dot each whole candy melt with pink frosting for the noses. Using the black icing, add eyes to the bunnies. Let stand for icing and faces to set. Serve.


Easter Bunny Cookie Bars

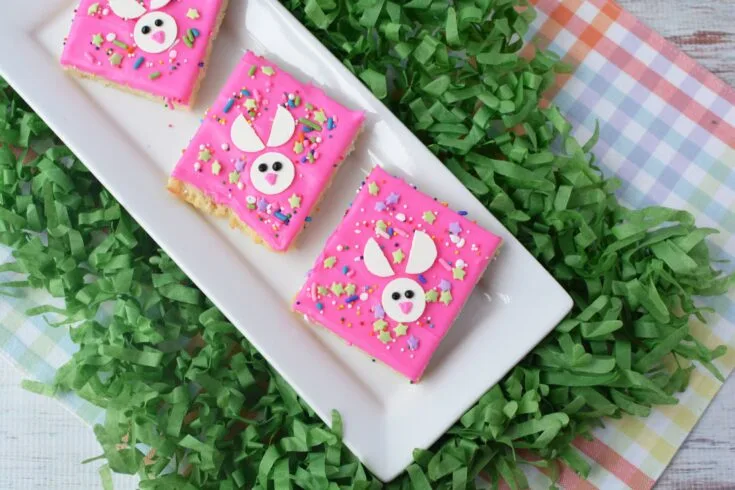
Candy melts create the cutest bunny decorations on these Easter Bunny Cookie Bars! They've got a soft, and chewy, coconut texture. Serve these festive bars for any Easter occasion.
Ingredients
- 1 2/3 Cups All-Purpose Flour
- 1/3 Cup Unsweetened Coconut
- 1/2 Teaspoon Salt
- 1 Cup Butter (Softened)
- 1/2 Cup Granulated Sugar
- 1 Egg
- 1/3 Cup Milk
For The Decorative Topping:
- 1 Tub, 16 oz, White Frosting
- Liquid Red Food Coloring
- 24 White Candy Melts
- 2 Tablespoons Rainbow Sprinkles or Easter Sprinkles
- Black Writing Icing
Instructions
- Preheat the oven to 350ºF. Line a 9x13-inch baking dish with parchment paper. In a mixing bowl, mix the flour, coconut, and salt; set aside.
- With an electric mixer on medium speed, beat 1 cup of butter and sugar until fluffy. Beat in egg, then milk. Stir in the flour mixture.
- Using moist fingers, press into the bottom of a pan. Bake until the edges are golden for 20-25 minutes. Let it cool completely.
- For the decorations: Tint the tub of frosting pink. Remove about 2 teaspoons of icing and place into a small resealable bag and seal shut. Set aside.
- Spread the remaining frosting over the cookie. Cut the cookie into 12 bars.
- Cut 12 white candy melts in half. Press whole candy melts (flat side up) into the frosting and 2 half candy melts onto frosting for bunny heads and ears.
- Add sprinkles to the icing while it's wet. Carefully remove any sprinkles from the candy melts.
- With the reserved pink frosting, cut a small tip in the bag and dot each whole candy melt with pink frosting for the noses. Using the black icing, add eyes to the bunnies.
- Let stand for icing and faces to set. Serve. Store any leftover cookies loosely covered in the refrigerator.
Notes
- Store the Easter Bunny Sugar Cookie Bars in an airtight food storage container. For the best freshness, enjoy within 3-4 days of baking. The dessert bars can also be frozen for up to three months. Store the bars in a freezer bag, keeping it flat in the freezer.
Recommended Products
As an Amazon Associate and member of other affiliate programs, I earn from qualifying purchases.


Nutrition Information:
Yield:
12Serving Size:
1Amount Per Serving: Calories: 448Total Fat: 23gSaturated Fat: 15gUnsaturated Fat: 8gCholesterol: 61mgSodium: 247mgCarbohydrates: 55gFiber: 2gSugar: 22gProtein: 5g
**Nutrition is calculated by a third party. Actual values may vary.